Friday, October 27, 2006
Black forest cherry quilt
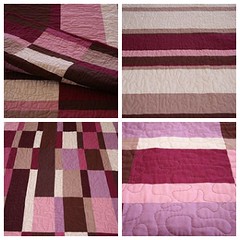
So, at long last, my black forest cherry quilt is finished (original post was here... only took me 103 days from start to finish).
The quilt book said that the quilting was to homogenise the overall colour design. I didn't particullarly believe them at the time but to me, there is a definite difference between this and this. I am glad I picked the duller purple colour to quilt in, rather that the red colour that is used for the edging. It ties it all together very well.
Some lessons learnt:
1) It is definately easier to do a single colour. This was only about 10 hours of quilting time instead of the 30 or so it took to do the last one. Unwaxed cotton also produces a much better effect - no more pulling on the curves on the underside, which was good as I want to use this as a doublesided quilt.
2) Paul and I worked out a nifty way to roll on the material so that it goes on the rollers nice and even. Because of the length, the middle tends to wind looser than the ends, and by introducing drag in the middle (a bit difficult to explain here but I can show you in person) we got the quilt on the rollers evenly. This made it much to get the lines nice and straight when I quilted.
3) Stop occasionally and tighten up all the screws on your sewing machine when you are doing lots of quilting - I didn't do this and the pressure foot came loose and the needle whacked into it and the result was this plus a rather annoying hole (now fixed) in my quilt.
4) I did some practice quilting before starting this one proper, and I realised pretty quickly that you have to do a motion that you can sustain consistenly over a large area. My quilting is much more curvy that the suggested design (which is kinda long stippling, rather than curvy) but I could do it consistently over the whole quilt, and I still like the effect.
5) As you roll more quilt onto the rollers, the working area (between the needle and rollers) gets ridiculously small (e.g. by the end, it was about 7 cm). To try to work around this without a lot of starting and stopping, I tried stopping the machine with the needle IN the quilt and moving the rollers with the needle down. Works OK - you need to have a bit of prior planning to ensure you stop it somewhere useful, and it's much better if you remember where you were going with the quilting when you restart, as otherwise you end up going somewhere strange and not continuing the previous line - which looks a bit dorky. I did get a couple of things like this from the restart, but all in all, not a bad technique.
Ok, now I am going to go lie down.
¶ 11:51 AM
